(serve-advanced-autoscaling)=
# Advanced Ray Serve Autoscaling
This guide goes over more advanced autoscaling parameters in [autoscaling_config](../api/doc/ray.serve.config.AutoscalingConfig.rst) and an advanced model composition example.
(serve-autoscaling-config-parameters)=
## Autoscaling config parameters
In this section, we go into more detail about Serve autoscaling concepts as well as how to set your autoscaling config.
### [Required] Define the steady state of your system
To define what the steady state of your deployments should be, set values for `target_num_ongoing_requests_per_replica` and `max_concurrent_queries`.
#### **target_num_ongoing_requests_per_replica [default=1]**
Serve scales the number of replicas for a deployment up or down based on the average number of ongoing requests per replica. Specifically, Serve compares the *actual* number of ongoing requests per replica with the target value you set in the autoscaling config and makes upscale or downscale decisions from that. The target value is set by `target_num_ongoing_requests_per_replica`, and Serve tries to make sure that each replica has roughly that number
of requests being processed and waiting in the queue.
It is always recommended to load test your workloads. For example, if the use case is latency sensitive, you can lower the `target_num_ongoing_requests_per_replica` number to maintain high performance. We recommend you benchmark your application code and set this number based on an end-to-end latency objective.
:::{note}
As an example, suppose you have two replicas of a synchronous deployment that has 100ms latency, serving a traffic load of 30 QPS. Then requests are assigned to replicas faster than the replicas can finish processing them; more and more requests are queued up at the replica (these are considered "ongoing requests") as time goes on, and then the average number of ongoing requests at each replica steadily increases. Latency will also increase since new requests have to wait for old requests to finish processing. If you set `target_num_ongoing_requests_per_replica = 1`, Serve detects a higher than desired number of ongoing requests per replica, and adds more replicas. At 3 replicas, your system would be able to process 30 QPS with 1 ongoing request per replica on average.
:::
#### **max_concurrent_queries [default=100]**
There is also a maximum queue limit that is proxies respect when assigning requests to replicas. The limit is defined by `max_concurrent_queries`. We recommend setting `max_concurrent_queries` to ~20 to 50% higher than `target_num_ongoing_requests_per_replica`. Note that `target_num_ongoing_requests_per_replica` should always be strictly less than `max_concurrent_queries`, otherwise the deployment never scales up. Take into account the following when setting `max_concurrent_queries`:
- Setting it too low limits upscaling. For instance, if your target value is 50 and `max_concurrent_queries` is 51, then even if the traffic increases significantly, the requests will queue up at the proxy instead of at the replicas. As a result, the autoscaler only increases the number of replicas at most 2% at a time, which is very slow.
- Setting it too high can lead to imbalanced routing. Concretely, this can lead to very high tail latencies during upscale, because when the autoscaler is scaling a deployment up due to a traffic spike, most or all of the requests might be assigned to the existing replicas before the new replicas are started.
### [Required] Define upper and lower autoscaling limits
To use autoscaling, you need to define the minimum and maximum number of resources allowed for your system.
* **min_replicas [default=1]**: This is the minimum number of replicas for the deployment. If you want to ensure your system can deal with a certain level of traffic at all times, set `min_replicas` to a positive number. On the other hand, if you anticipate periods of no traffic and want to scale to zero to save cost, set `min_replicas = 0`. Note that setting `min_replicas = 0` causes higher tail latencies; when you start sending traffic, the deployment scales up, and there will be a cold start time as Serve waits for replicas to be started to serve the request.
* **max_replicas [default=1]**: This is the maximum number of replicas for the deployment. This should be greater than `min_replicas`. Ray Serve Autoscaling relies on the Ray Autoscaler to scale up more nodes when the currently available cluster resources (CPUs, GPUs, etc.) are not enough to support more replicas.
* **initial_replicas**: This is the number of replicas that are started initially for the deployment. This defaults to the value for `min_replicas`.
### [Optional] Define how the system reacts to changing traffic
Given a steady stream of traffic and appropriately configured `min_replicas` and `max_replicas`, the steady state of your system is essentially fixed for a chosen configuration value for `target_num_ongoing_requests_per_replica`. Before reaching steady state, however, your system is reacting to traffic shifts. How you want your system to react to changes in traffic determines how you want to set the remaining autoscaling configurations.
* **upscale_delay_s [default=30s]**: This defines how long Serve waits before scaling up the number of replicas in your deployment. In other words, this parameter controls the frequency of upscale decisions. If the replicas are *consistently* serving more requests than desired for an `upscale_delay_s` number of seconds, then Serve scales up the number of replicas based on aggregated ongoing requests metrics. For example, if your service is likely to experience bursts of traffic, you can lower `upscale_delay_s` so that your application can react quickly to increases in traffic.
* **downscale_delay_s [default=600s]**: This defines how long Serve waits before scaling down the number of replicas in your deployment. In other words, this parameter controls the frequency of downscale decisions. If the replicas are *consistently* serving less requests than desired for a `downscale_delay_s` number of seconds, then Serve scales down the number of replicas based on aggregated ongoing requests metrics. For example, if your application initializes slowly, you can increase `downscale_delay_s` to make the downscaling happen more infrequently and avoid reinitialization when the application needs to upscale again in the future.
* **upscale_smoothing_factor [default_value=1.0]**: The multiplicative factor to amplify or moderate each upscaling decision. For example, when the application has high traffic volume in a short period of time, you can increase `upscale_smoothing_factor` to scale up the resource quickly. This parameter is like a "gain" factor to amplify the response of the autoscaling algorithm.
* **downscale_smoothing_factor [default_value=1.0]**: The multiplicative factor to amplify or moderate each downscaling decision. For example, if you want your application to be less sensitive to drops in traffic and scale down more conservatively, you can decrease `downscale_smoothing_factor` to slow down the pace of downscaling.
* **metrics_interval_s [default_value=10]**: This controls how often each replica sends reports on current ongoing requests to the autoscaler. Note that the autoscaler can't make new decisions if it doesn't receive updated metrics, so you most likely want to set `metrics_interval_s` to a value that is less than or equal to the upscale and downscale delay values. For instance, if you set `upscale_delay_s = 3`, but keep `metrics_interval_s = 10`, the autoscaler only upscales roughly every 10 seconds.
* **look_back_period_s [default_value=30]**: This is the window over which the average number of ongoing requests per replica is calculated.
## Model composition example
Determining the autoscaling configuration for a multi-model application requires understanding each deployment's scaling requirements. Every deployment has a different latency and differing levels of concurrency. As a result, finding the right autoscaling config for a model-composition application requires experimentation.
This example is a simple application with three deployments composed together to build some intuition about multi-model autoscaling. Assume these deployments:
* `HeavyLoad`: A mock 200ms workload with high CPU usage.
* `LightLoad`: A mock 100ms workload with high CPU usage.
* `Driver`: A driver deployment that fans out to the `HeavyLoad` and `LightLoad` deployments and aggregates the two outputs.
### Attempt 1: One `Driver` replica
First consider the following deployment configurations. Because the driver deployment has low CPU usage and is only asynchronously making calls to the downstream deployments, allocating one fixed `Driver` replica is reasonable.
::::{tab-set}
:::{tab-item} Driver
```yaml
- name: Driver
num_replicas: 1
max_concurrent_queries: 200
```
:::
:::{tab-item} HeavyLoad
```yaml
- name: HeavyLoad
max_concurrent_queries: 3
autoscaling_config:
target_num_ongoing_requests_per_replica: 1
min_replicas: 0
initial_replicas: 0
max_replicas: 200
upscale_delay_s: 3
downscale_delay_s: 60
upscale_smoothing_factor: 0.3
downscale_smoothing_factor: 0.3
metrics_interval_s: 2
look_pack_period_s: 10
```
:::
:::{tab-item} LightLoad
```yaml
- name: LightLoad
max_concurrent_queries: 3
autoscaling_config:
target_num_ongoing_requests_per_replica: 1
min_replicas: 0
initial_replicas: 0
max_replicas: 200
upscale_delay_s: 3
downscale_delay_s: 60
upscale_smoothing_factor: 0.3
downscale_smoothing_factor: 0.3
metrics_interval_s: 2
look_pack_period_s: 10
```
:::
:::{tab-item} Application Code
```{literalinclude} ../doc_code/autoscale_model_comp_example.py
:language: python
:start-after: __serve_example_begin__
:end-before: __serve_example_end__
```
:::
::::
Running the same Locust load test from the [Resnet workload](resnet-autoscaling-example) generates the following results:
| | |
| ----------------------- | ---------------------- |
| HeavyLoad and LightLoad Number Replicas |  |
As you might expect, the number of autoscaled `LightLoad` replicas is roughly half that of autoscaled `HeavyLoad` replicas. Although the same number of requests per second are sent to both deployments, `LightLoad` replicas can process twice as many requests per second as `HeavyLoad` replicas can, so the deployment should need half as many replicas to handle the same traffic load.
Unfortunately, the service latency rises to from 230 to 400 ms when the number of Locust users increases to 100.
| P50 Latency | QPS |
| ------- | --- |
|  |  |
Note that the number of `HeavyLoad` replicas should roughly match the number of Locust users to adequately serve the Locust traffic. However, when the number of Locust users increased to 100, the `HeavyLoad` deployment struggled to reach 100 replicas, and instead only reached 65 replicas. The per-deployment latencies reveal the root cause. While `HeavyLoad` and `LightLoad` latencies stayed steady at 200ms and 100ms, `Driver` latencies rose from 230 to 400 ms. This suggests that the high Locust workload may be overwhelming the `Driver` replica and impacting its asynchronous event loop's performance.
### Attempt 2: Autoscale `Driver`
For this attempt, set an autoscaling configuration for `Driver` as well, with the setting `target_num_ongoing_requests_per_replica = 20`. Now the deployment configurations are as follows.
::::{tab-set}
:::{tab-item} Driver
```yaml
- name: Driver
max_concurrent_queries: 200
autoscaling_config:
target_num_ongoing_requests_per_replica: 20
min_replicas: 1
initial_replicas: 1
max_replicas: 10
upscale_delay_s: 3
downscale_delay_s: 60
upscale_smoothing_factor: 0.3
downscale_smoothing_factor: 0.3
metrics_interval_s: 2
look_pack_period_s: 10
```
:::
:::{tab-item} HeavyLoad
```yaml
- name: HeavyLoad
max_concurrent_queries: 3
autoscaling_config:
target_num_ongoing_requests_per_replica: 1
min_replicas: 0
initial_replicas: 0
max_replicas: 200
upscale_delay_s: 3
downscale_delay_s: 60
upscale_smoothing_factor: 0.3
downscale_smoothing_factor: 0.3
metrics_interval_s: 2
look_pack_period_s: 10
```
:::
:::{tab-item} LightLoad
```yaml
- name: LightLoad
max_concurrent_queries: 3
autoscaling_config:
target_num_ongoing_requests_per_replica: 1
min_replicas: 0
initial_replicas: 0
max_replicas: 200
upscale_delay_s: 3
downscale_delay_s: 60
upscale_smoothing_factor: 0.3
downscale_smoothing_factor: 0.3
metrics_interval_s: 2
look_pack_period_s: 10
```
:::
::::
Running the same Locust load test again generates the following results:
| | |
| ------------------------------------ | ------------------- |
| HeavyLoad and LightLoad Number Replicas |
|
As you might expect, the number of autoscaled `LightLoad` replicas is roughly half that of autoscaled `HeavyLoad` replicas. Although the same number of requests per second are sent to both deployments, `LightLoad` replicas can process twice as many requests per second as `HeavyLoad` replicas can, so the deployment should need half as many replicas to handle the same traffic load.
Unfortunately, the service latency rises to from 230 to 400 ms when the number of Locust users increases to 100.
| P50 Latency | QPS |
| ------- | --- |
|  |  |
Note that the number of `HeavyLoad` replicas should roughly match the number of Locust users to adequately serve the Locust traffic. However, when the number of Locust users increased to 100, the `HeavyLoad` deployment struggled to reach 100 replicas, and instead only reached 65 replicas. The per-deployment latencies reveal the root cause. While `HeavyLoad` and `LightLoad` latencies stayed steady at 200ms and 100ms, `Driver` latencies rose from 230 to 400 ms. This suggests that the high Locust workload may be overwhelming the `Driver` replica and impacting its asynchronous event loop's performance.
### Attempt 2: Autoscale `Driver`
For this attempt, set an autoscaling configuration for `Driver` as well, with the setting `target_num_ongoing_requests_per_replica = 20`. Now the deployment configurations are as follows.
::::{tab-set}
:::{tab-item} Driver
```yaml
- name: Driver
max_concurrent_queries: 200
autoscaling_config:
target_num_ongoing_requests_per_replica: 20
min_replicas: 1
initial_replicas: 1
max_replicas: 10
upscale_delay_s: 3
downscale_delay_s: 60
upscale_smoothing_factor: 0.3
downscale_smoothing_factor: 0.3
metrics_interval_s: 2
look_pack_period_s: 10
```
:::
:::{tab-item} HeavyLoad
```yaml
- name: HeavyLoad
max_concurrent_queries: 3
autoscaling_config:
target_num_ongoing_requests_per_replica: 1
min_replicas: 0
initial_replicas: 0
max_replicas: 200
upscale_delay_s: 3
downscale_delay_s: 60
upscale_smoothing_factor: 0.3
downscale_smoothing_factor: 0.3
metrics_interval_s: 2
look_pack_period_s: 10
```
:::
:::{tab-item} LightLoad
```yaml
- name: LightLoad
max_concurrent_queries: 3
autoscaling_config:
target_num_ongoing_requests_per_replica: 1
min_replicas: 0
initial_replicas: 0
max_replicas: 200
upscale_delay_s: 3
downscale_delay_s: 60
upscale_smoothing_factor: 0.3
downscale_smoothing_factor: 0.3
metrics_interval_s: 2
look_pack_period_s: 10
```
:::
::::
Running the same Locust load test again generates the following results:
| | |
| ------------------------------------ | ------------------- |
| HeavyLoad and LightLoad Number Replicas | 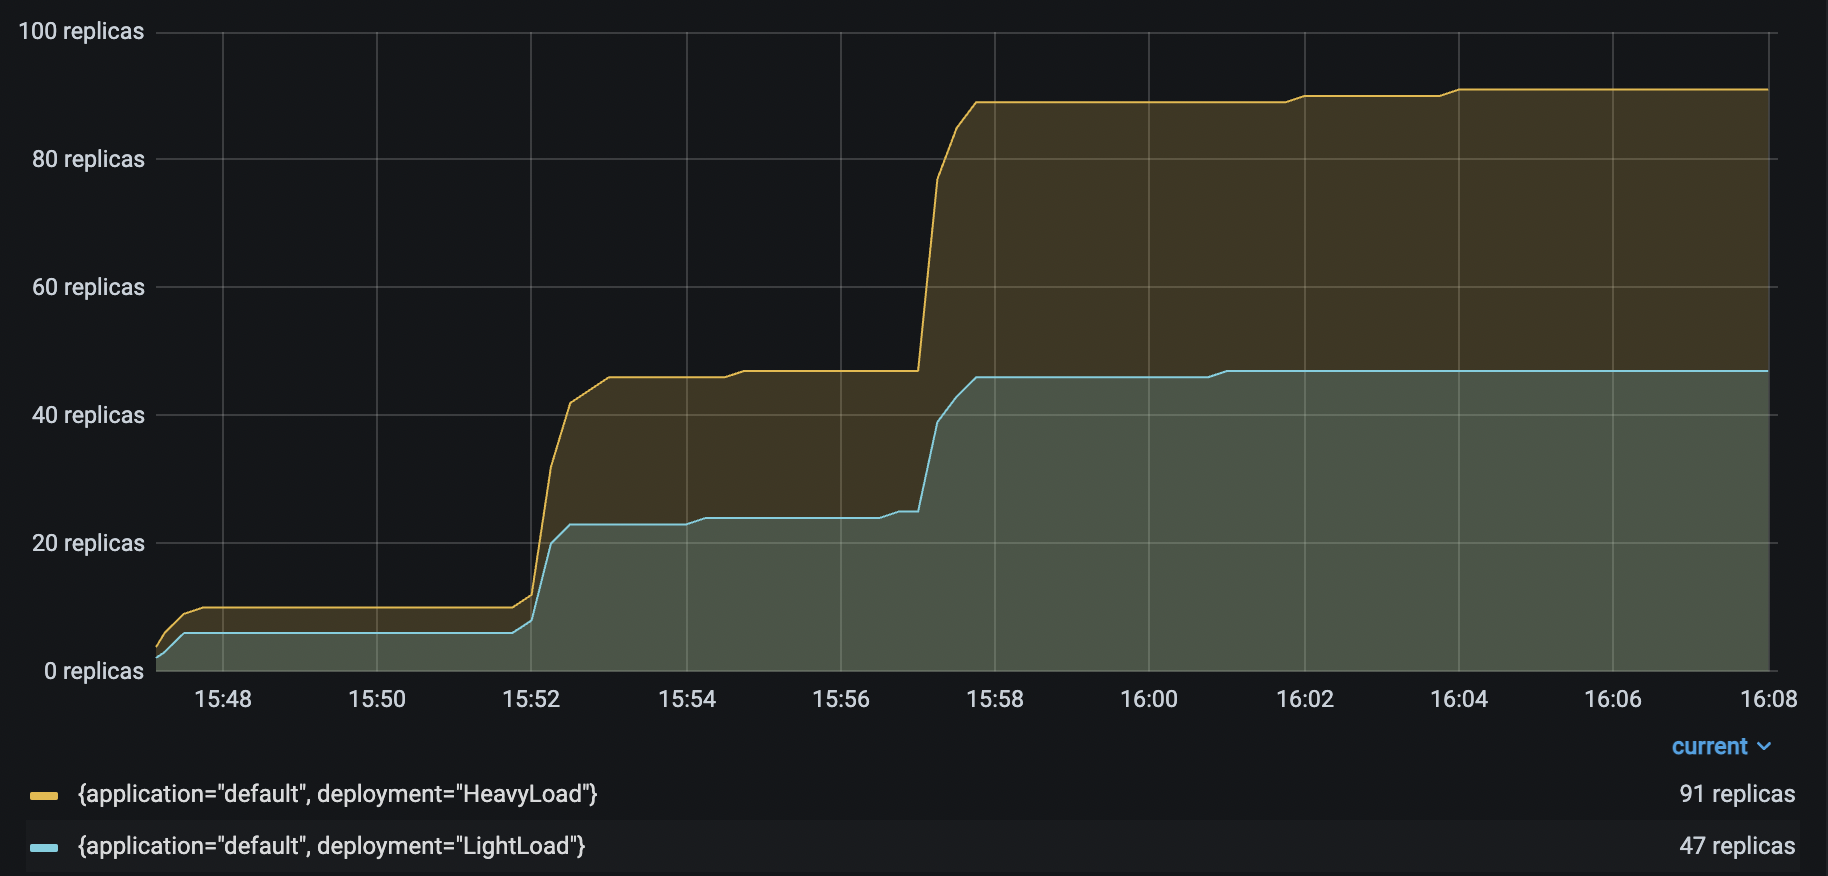 |
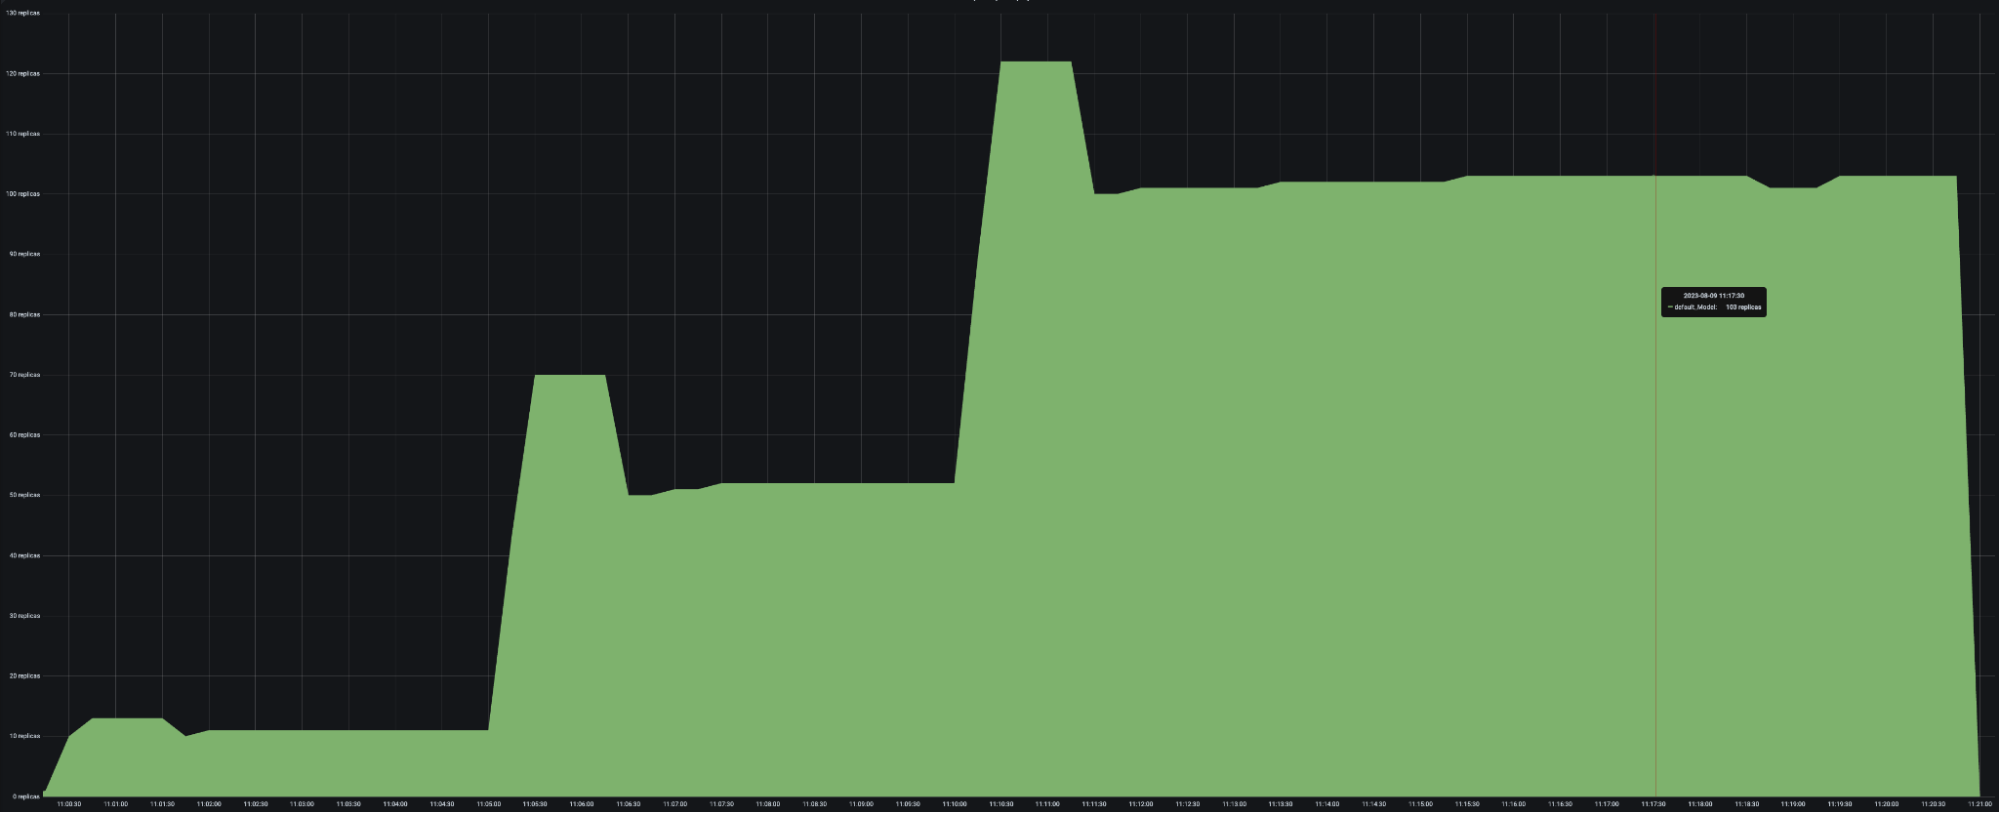
| Driver Number Replicas |
|
| Driver Number Replicas | 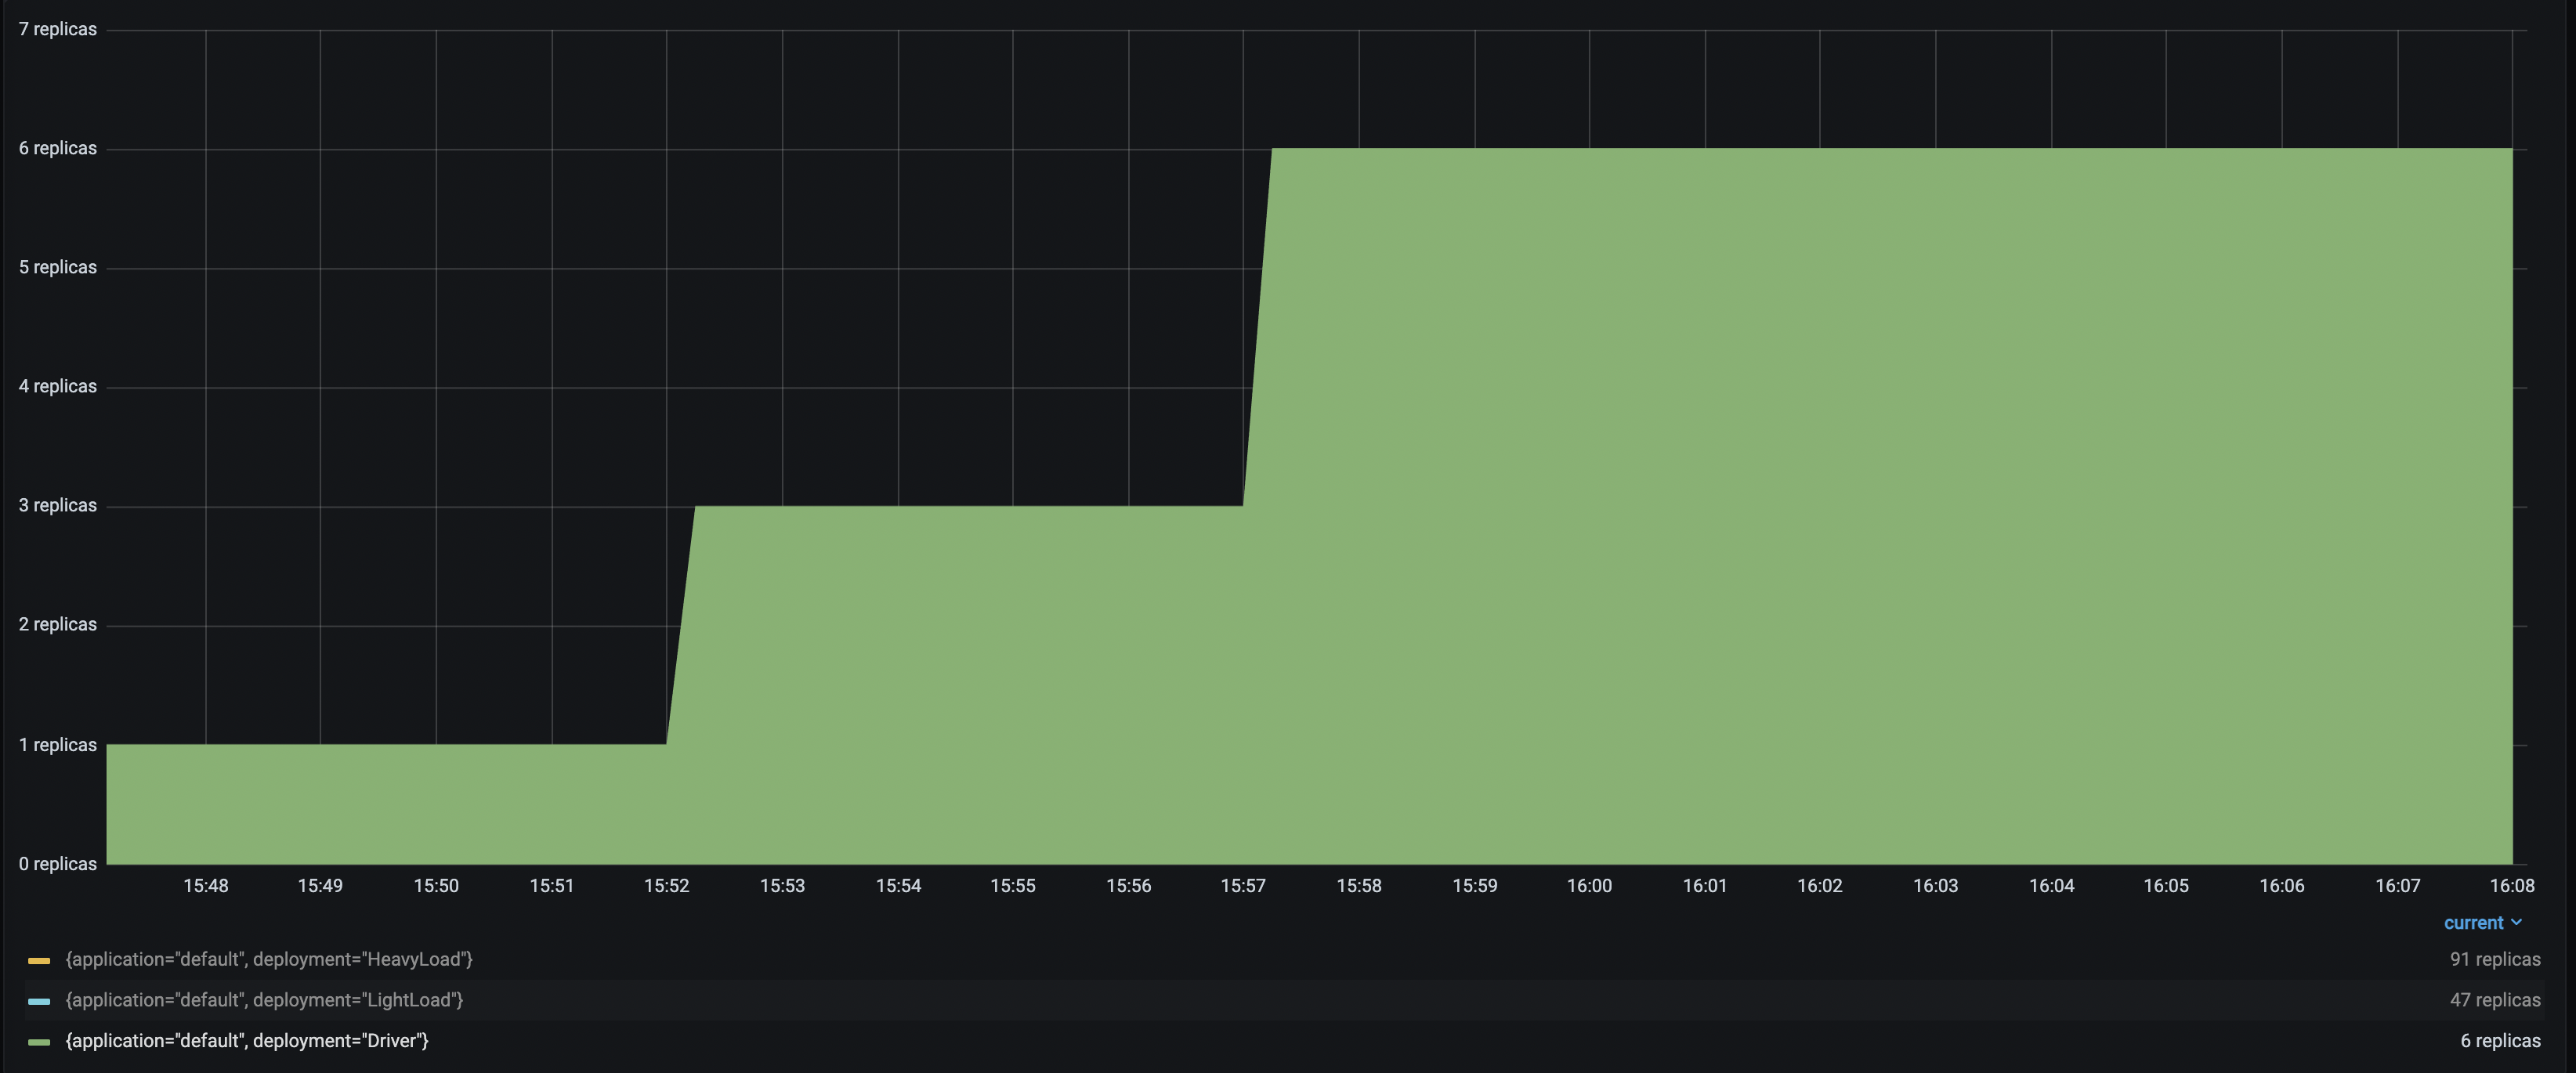 With up to 6 `Driver` deployments to receive and distribute the incoming requests, the `HeavyLoad` deployment successfully scales up to 90+ replicas, and `LightLoad` up to 47 replicas. This configuration helps the application latency stay consistent as the traffic load increases.
| Improved P50 Latency | Improved RPS |
| ---------------- | ------------ |
|  |  |
## Troubleshooting guide
### Unstable number of autoscaled replicas
If the number of replicas in your deployment keeps oscillating even though the traffic is relatively stable, try the following:
* Set a smaller `upscale_smoothing_factor` and `downscale_smoothing_factor`. Setting both values smaller than one helps the autoscaler make more conservative upscale and downscale decisions. It effectively smooths out the replicas graph, and there will be less "sharp edges".
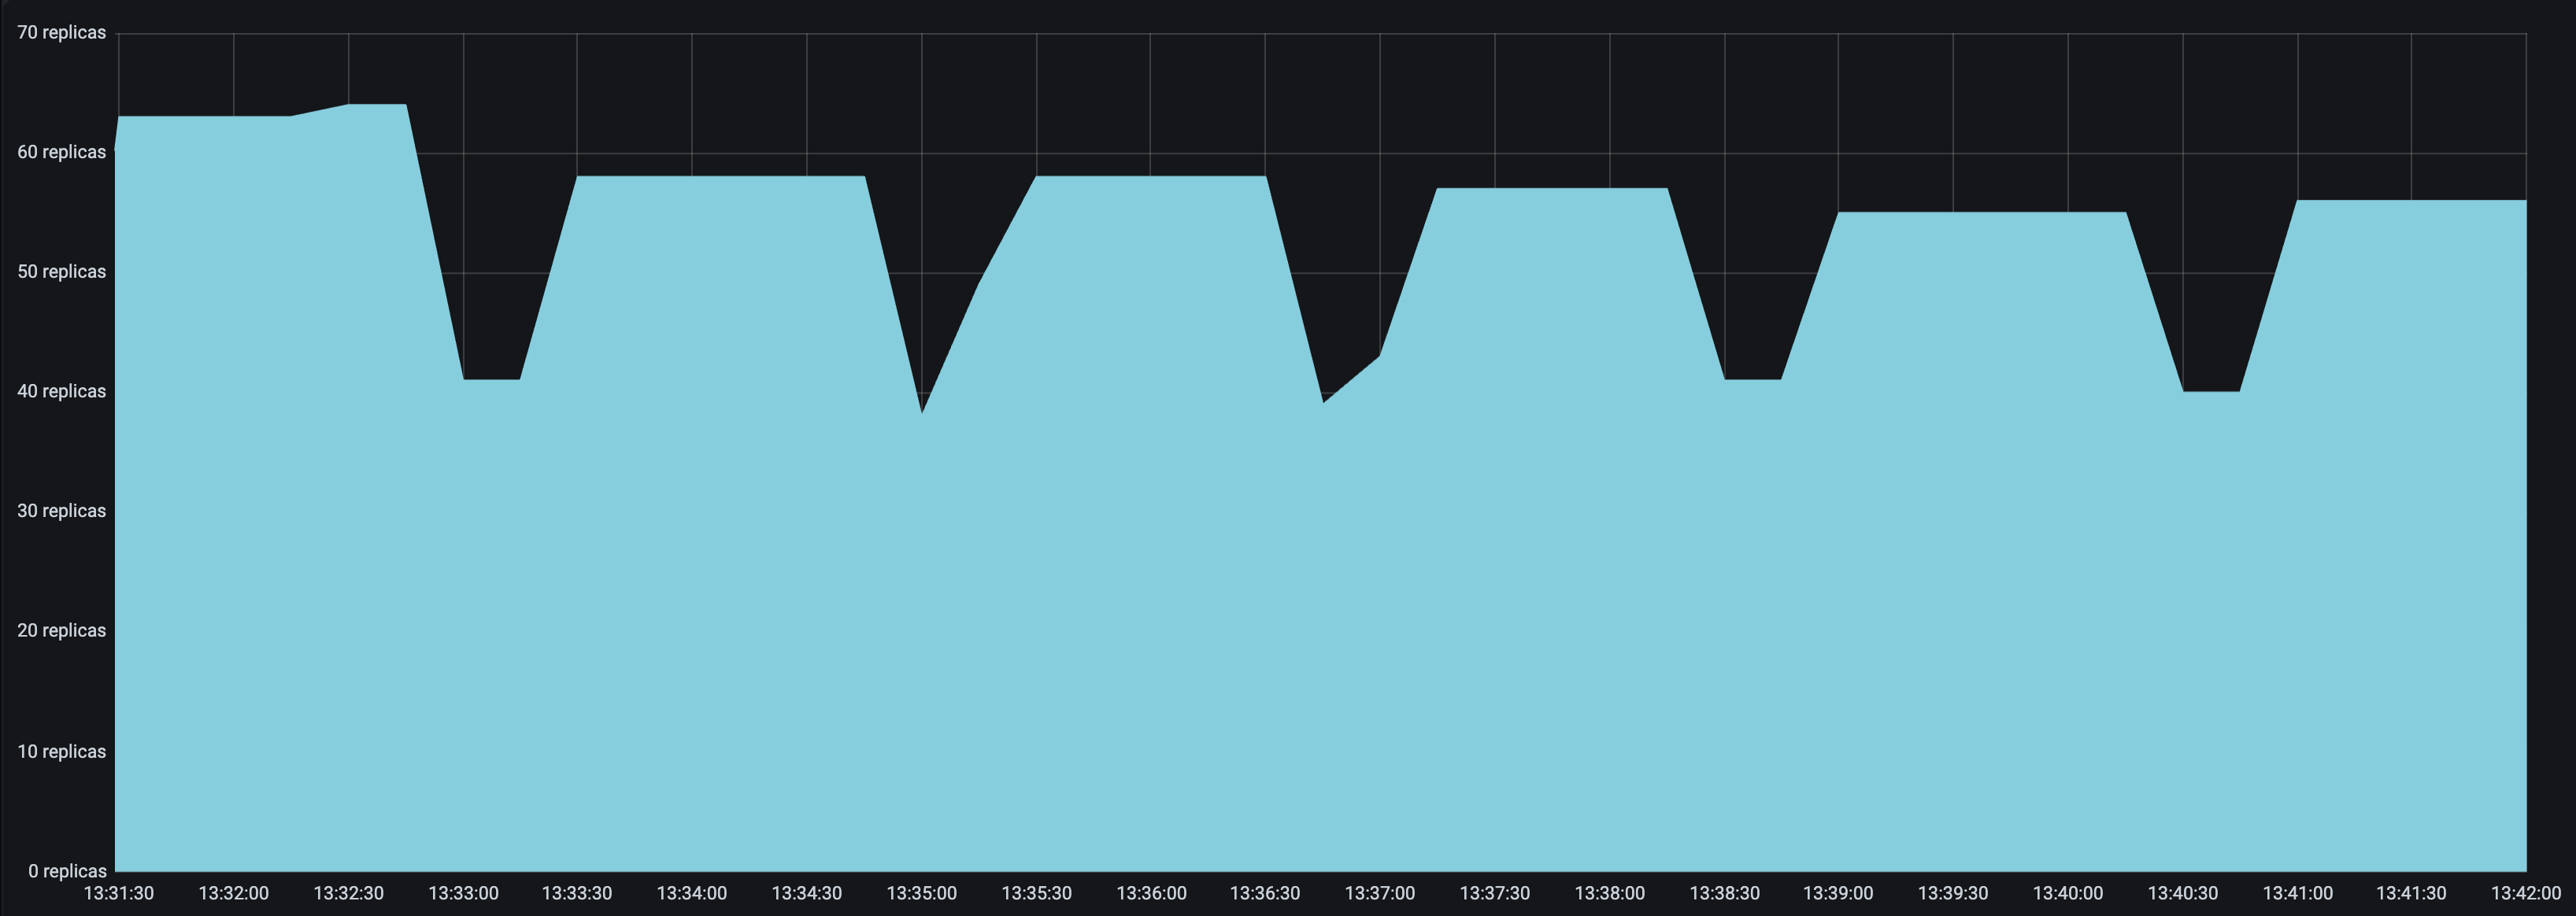
* Set a `look_back_period_s` value that matches the rest of the autoscaling config. For longer upscale and downscale delay values, a longer look back period can likely help stabilize the replica graph, but for shorter upscale and downscale delay values, a shorter look back period may be more appropriate. For instance, the following replica graphs show how a deployment with `upscale_delay_s = 3` works with a longer vs shorter look back period.
| `look_back_period_s = 30` | `look_back_period_s = 3` |
| ------------------------------------------------ | ----------------------------------------------- |
|  |  |
### High spikes in latency during bursts of traffic
If you expect your application to receive bursty traffic, and at the same time want the deployments to scale down in periods of inactivity, you are likely concerned about how quickly the deployment can scale up and respond to bursts of traffic. While an increase in latency initially during a burst in traffic may be unavoidable, you can try the following to improve latency during bursts of traffic.
* Set a lower `upscale_delay_s`. The autoscaler always waits `upscale_delay_s` seconds before making a decision to upscale, so lowering this delay allows the autoscaler to react more quickly to changes, especially bursts, of traffic.
* Set a larger `upscale_smoothing_factor`. If `upscale_smoothing_factor > 1`, then the autoscaler scales up more aggressively than normal. This setting can allow your deployment to be more sensitive to bursts of traffic.
* Lower the `metric_interval_s`. Always set `metric_interval_s` to be less than or equal to `upscale_delay_s`, otherwise upscaling is delayed because the autoscaler doesn't receive fresh information often enough.
* Set a lower `max_concurrent_queries`. If `max_concurrent_queries` is too high relative to `target_num_ongoing_requests_per_replica`, then when traffic increases, most or all of the requests might be assigned to the existing replicas before the new replicas are started. This setting can lead to very high latencies during upscale.
### Deployments scaling down too quickly
You may observe that deployments are scaling down too quickly. Instead, you may want the downscaling to be much more conservative to maximize the availability of your service.
* Set a longer `downscale_delay_s`. The autoscaler always waits `downscale_delay_s` seconds before making a decision to downscale, so by increasing this number, your system has a longer "grace period" after traffic drops before the autoscaler starts to remove replicas.
* Set a smaller `downscale_smoothing_factor`. If `downscale_smoothing_factor < 1`, then the autoscaler removes *less replicas* than what it thinks it should remove to achieve the target number of ongoing requests. In other words, the autoscaler makes more conservative downscaling decisions.
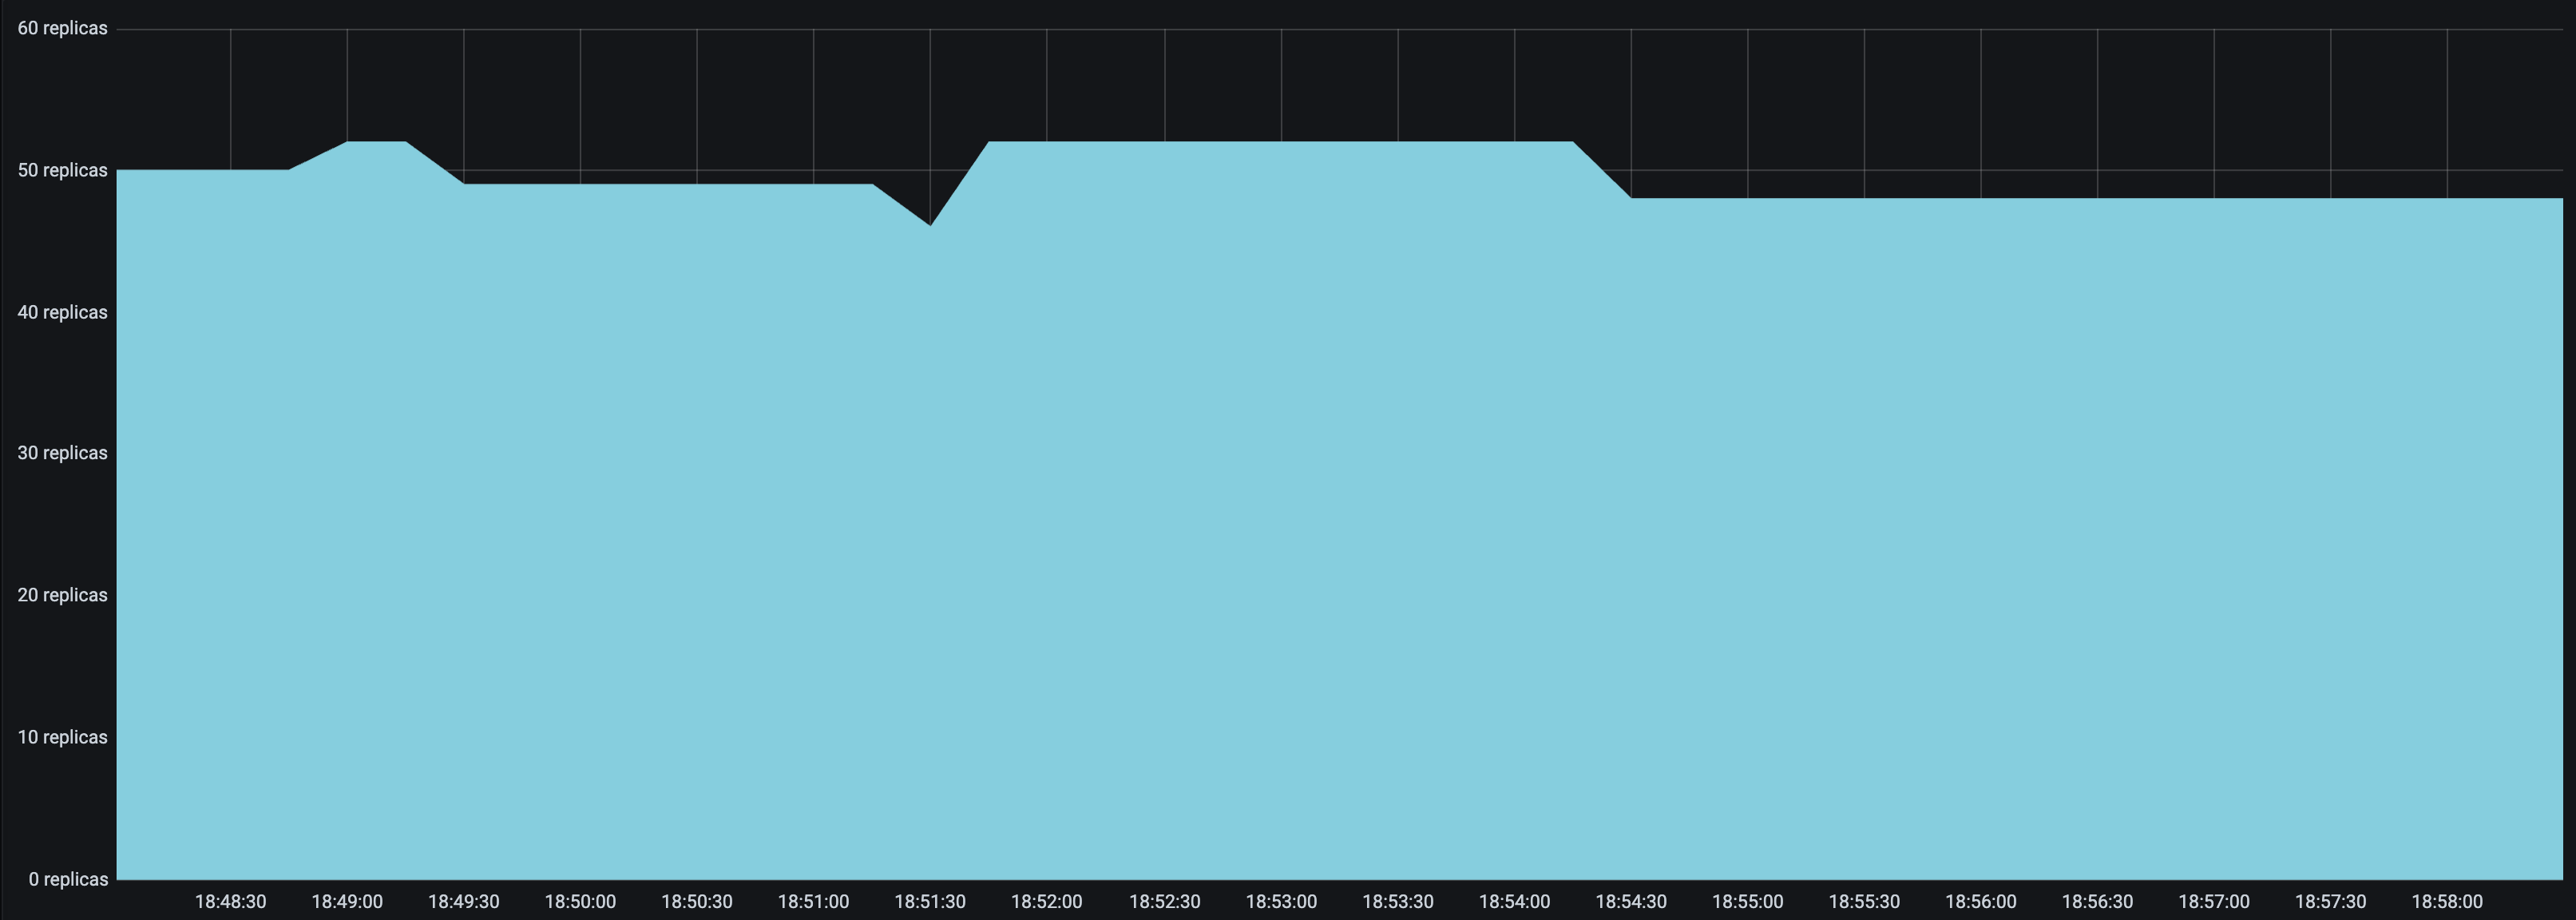
| `downscale_smoothing_factor = 1` | `downscale_smoothing_factor = 0.5` |
| ------------------------------------------------ | ----------------------------------------------- |
|  |  |
With up to 6 `Driver` deployments to receive and distribute the incoming requests, the `HeavyLoad` deployment successfully scales up to 90+ replicas, and `LightLoad` up to 47 replicas. This configuration helps the application latency stay consistent as the traffic load increases.
| Improved P50 Latency | Improved RPS |
| ---------------- | ------------ |
|  |  |
## Troubleshooting guide
### Unstable number of autoscaled replicas
If the number of replicas in your deployment keeps oscillating even though the traffic is relatively stable, try the following:
* Set a smaller `upscale_smoothing_factor` and `downscale_smoothing_factor`. Setting both values smaller than one helps the autoscaler make more conservative upscale and downscale decisions. It effectively smooths out the replicas graph, and there will be less "sharp edges".
* Set a `look_back_period_s` value that matches the rest of the autoscaling config. For longer upscale and downscale delay values, a longer look back period can likely help stabilize the replica graph, but for shorter upscale and downscale delay values, a shorter look back period may be more appropriate. For instance, the following replica graphs show how a deployment with `upscale_delay_s = 3` works with a longer vs shorter look back period.
| `look_back_period_s = 30` | `look_back_period_s = 3` |
| ------------------------------------------------ | ----------------------------------------------- |
|  |  |
### High spikes in latency during bursts of traffic
If you expect your application to receive bursty traffic, and at the same time want the deployments to scale down in periods of inactivity, you are likely concerned about how quickly the deployment can scale up and respond to bursts of traffic. While an increase in latency initially during a burst in traffic may be unavoidable, you can try the following to improve latency during bursts of traffic.
* Set a lower `upscale_delay_s`. The autoscaler always waits `upscale_delay_s` seconds before making a decision to upscale, so lowering this delay allows the autoscaler to react more quickly to changes, especially bursts, of traffic.
* Set a larger `upscale_smoothing_factor`. If `upscale_smoothing_factor > 1`, then the autoscaler scales up more aggressively than normal. This setting can allow your deployment to be more sensitive to bursts of traffic.
* Lower the `metric_interval_s`. Always set `metric_interval_s` to be less than or equal to `upscale_delay_s`, otherwise upscaling is delayed because the autoscaler doesn't receive fresh information often enough.
* Set a lower `max_concurrent_queries`. If `max_concurrent_queries` is too high relative to `target_num_ongoing_requests_per_replica`, then when traffic increases, most or all of the requests might be assigned to the existing replicas before the new replicas are started. This setting can lead to very high latencies during upscale.
### Deployments scaling down too quickly
You may observe that deployments are scaling down too quickly. Instead, you may want the downscaling to be much more conservative to maximize the availability of your service.
* Set a longer `downscale_delay_s`. The autoscaler always waits `downscale_delay_s` seconds before making a decision to downscale, so by increasing this number, your system has a longer "grace period" after traffic drops before the autoscaler starts to remove replicas.
* Set a smaller `downscale_smoothing_factor`. If `downscale_smoothing_factor < 1`, then the autoscaler removes *less replicas* than what it thinks it should remove to achieve the target number of ongoing requests. In other words, the autoscaler makes more conservative downscaling decisions.
| `downscale_smoothing_factor = 1` | `downscale_smoothing_factor = 0.5` |
| ------------------------------------------------ | ----------------------------------------------- |
|  |  |